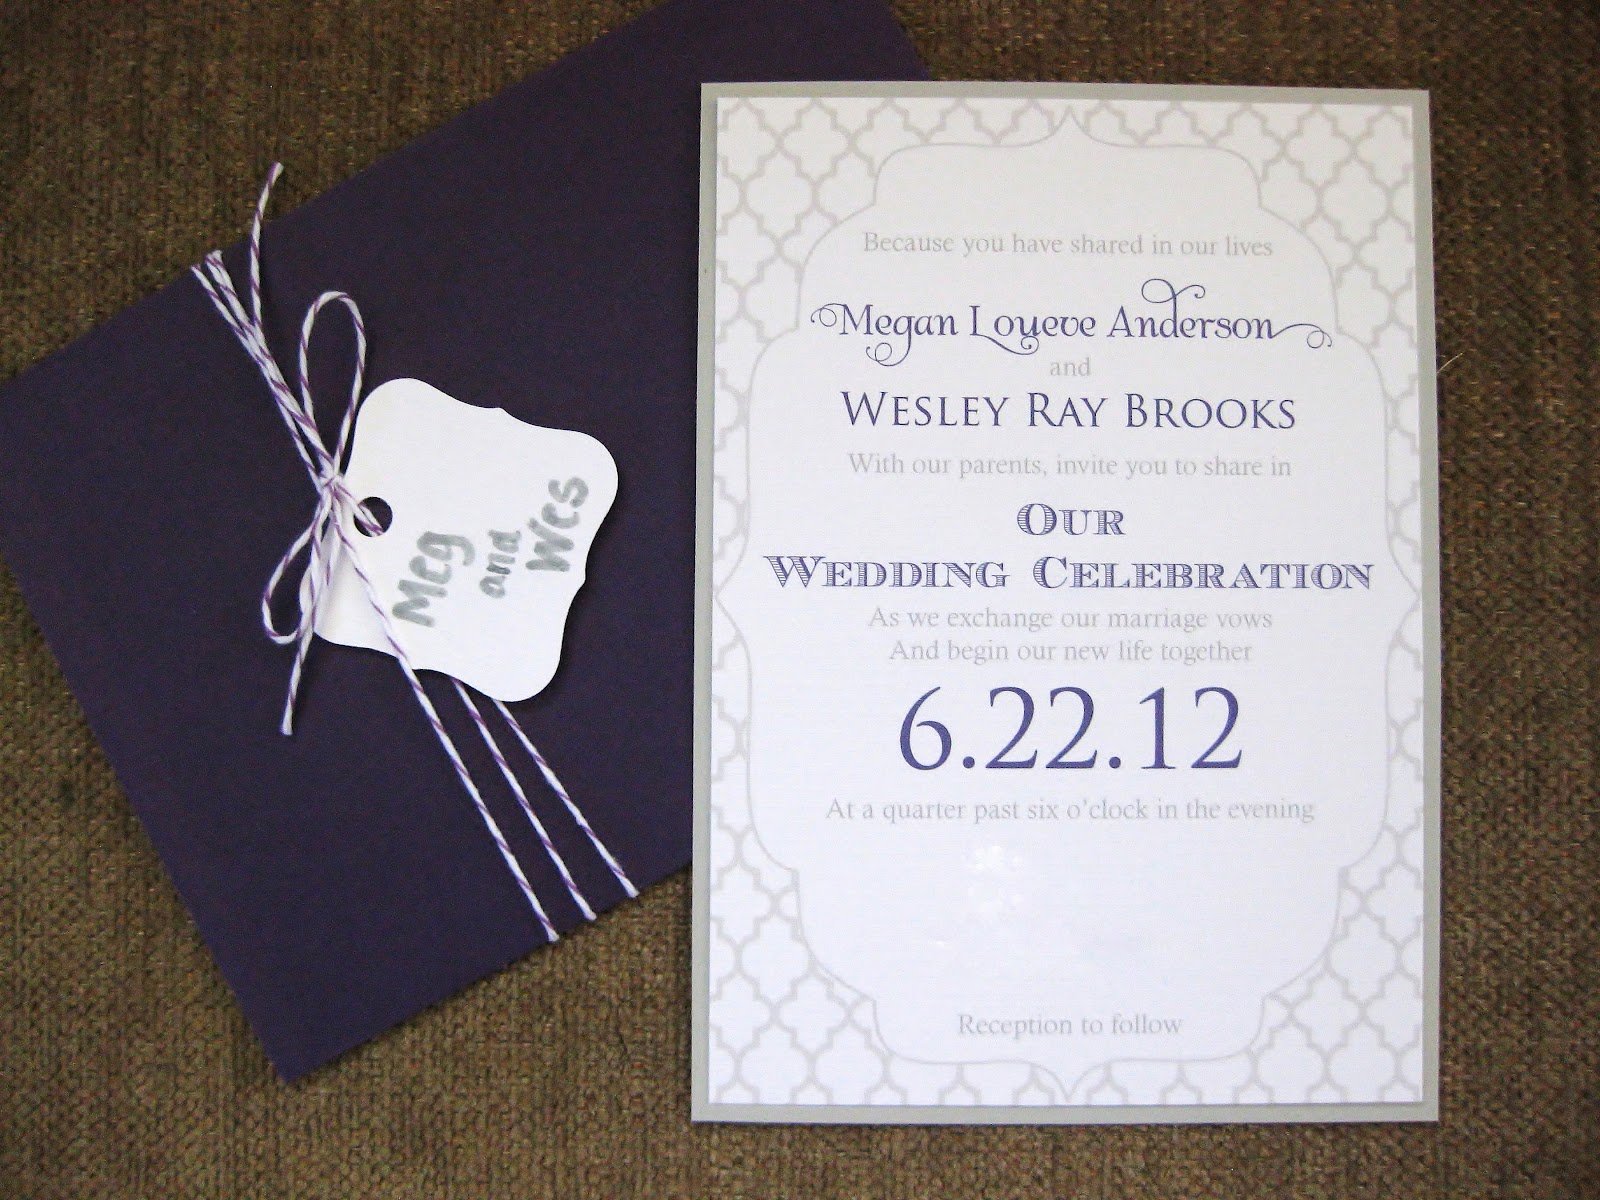
Thursday, May 31, 2012

RINGS! Part 2

And the ring drama continues! Wes’s was actually a bit harder to find!  
Wes felt very weird about spending gobs of money on a ring. Also, he is a very active person. He is always doing something that would probably scratch up a soft metal ring. This got me thinking that maybe a harder type of metal might be better than gold. There’s a few options for people in the market for a nontraditional metal ring.

There’s tungsten, titanium, cobalt and palladium just to name a few. In particular, tungsten and titanium are significantly cheaper than white gold. If you are interested in knowing how all these metals compare I suggest these site:


Tungsten is much harder than gold and it is getting easier to find tungsten rings, so we gravitated towards this metal. Tungsten is hypoallergenic, doesn’t scratch, and stays polished forever. Too good to be true right? Well, yes in my opinion. Tungsten is a dark metal so it doesn’t look like white gold at all. Trust me we ordered some and they were very dark. However, they can be made lighter by plating it with some other metal and is thus called white tungsten but it is harder to find than regular tungsten. But here's the worse part… tungsten is difficult to get off in case of an emergency, as well. It is not impossible to get it off, but it takes longer. (I can hear Wes’s mom in my head right now saying “Wes you better get white gold instead of tungsten!”). Also, I felt that if we were going to consider white tungsten that we should go through a reputable company to make sure it was made out of tungsten carbide instead of lead! I was not very confident that some strange internet website selling rings for $20 would be able to confirm for me exactly what the ring was made out of.

For the record, I am team white gold! However, white gold isn’t all it is cracked up to be either. White gold is made by mixing gold with white metals like nickel or palladium and then is plated with rhodium. The rhodium wears off quickly. I have only had my engagement ring for two years and it is already yellowing. So, I have to take it in to get it replated which will cost $45. If it is plated with something else to make it white then what is the point of getting white gold anyway!?!

 I guess the only thing I recommend to people is that you do your homework and know exactly what you are buying.  

Wes tried on white tungsten carbide and white gold at the jewelers. He knew before going that he wanted a very plain band. No designs. No inlays. No fancy finishing. He decided he liked exactly 5mm, not 4mm or 6mm. He liked the ringed domed, not flat. He instantly liked this 5mm white tungsten ring the jeweler had. I was hoping we could it in white gold so in case of an emergency paramedics would be able to cut it off. However, the domed rings are more expensive because there’s more metal compared to the flat rings, so the jeweler gave us another crazy price for white gold. They didn’t have any older rings in the back like mine, so we left without a ring for him. We did some searching online and found white gold and white tungsten carbide rings on sale at Macy’s. I also had a 15% coupon so we order both of them to look at.

 Here they are:


Tungsten on right.

Tunsten on right. This is my hand - Wes's hand isn't that girlie!

They look the same in color. The only difference is that the white gold ring is a little flatter than the white tungsten. Both are comfort fit. The white tungsten was much cheaper. Again, I am team white gold.

AND he picked (drumroll)…


Tungsten. Oh well. Little does he know that his wedding present from me is going to be a vice grip for him to carry at all times in case we have to crack his ring off.

RINGS! Part 1

We have our rings! Hooray!

I spent a little bit of time thinking about what I wanted. My engagement ring is fairly simple ring with a round stone set in a very thin pave band made up of little round diamonds. Non-matching wedding rings are becoming very popular. I think it looks great and there’s something so brave about going with something nontraditional and having the confidence to carry it off. Check this one out:


I definitely can’t afford to get more diamonds or bigger diamonds so I thought maybe I can get a metal other than white gold. Such as rose gold! I looooooove rose gold right now. I have this beautiful rose gold watch that I got for my birthday. I wanted to try out the look before committing to it, so I ordered a fake rose gold thin pave ring from a costume jewelry store.

I like it! But, let’s be honest… my love for rose gold might not last forever and I am not a brave person. Thus, I decided to stick with a matching band. I tried a few others things at the jewelry store just to check, but it only confirmed that I should go with a matching band.

Until they told me the price… It was double the price of my engagement ring setting. WOAH! Why you ask? More diamonds? Nope. Better diamonds? Nope. Better metal? Nope. It was more expensive than my setting because the price of gold has been sky rocketing. Sad face.

I literally almost burst into tears because I had no idea what we were going to do. Wes was so wonderful. He told me that we could get it and that we would just figure it out. While I am sure this what any girl wants to hear, I just couldn’t spend the money. The lady could see that she wasn’t going to get a sale out of me and that I was really upset. That’s when she said that they had older rings sitting around that were ordered back when the price of gold was less and that they would be cheaper. We went through them and found one that is almost exactly the same as my engagement setting. Bingo. It was half the cost of the “matching” wedding ring.

Here it is!

This ring doesn’t fit perfectly up against my engagement ring, but I can live with that.

Maybe from time to time I'll slip the rose gold ring between the two to change it up. J

Saturday, April 28, 2012

A pet peeve.

As a to-be bride who has been engaged 2+ years, I've watched a lot of wedding shows. There's something that happens at a lot of weddings that just drives me NUTS. I even see it happen in David Tutera's My Fair Wedding. And, as an expert in wedding etiquette, I am so sad that David doesn't always remind his brides NOT to do this... What am I talking about? I am talking about this:

Such a cool bouquet, but you're holding it all wrong!

I can't see your dress!


Oh yes perfect Anne Hathaway...you did it wrong, too!

I can't stand when brides hold their bouquet too high. It ruins the whole walk down the aisle thing for me! When brides hold their bouquet too high, then we can't see their dress and it detracts from their glowing face. I see it happen so often that I can't help but hold my breath when a bride starts to come down the aisle just to wait to see if she is going to hold her flowers the right way. I talk about this so much to Wes, that he showed me this picture this morning:


This is Ryan Tannehill, the new quarterback for the Miami Dolphins, and his lovely bride, Lauren. He was drafted on Thursday and as an avid Dolphin fan, I fell instantly in love with Tannehill. And, I love his wife as well, because she holds her bouquet the right way! The sad part is that Wes showed me this picture just to point out that she held her bouquet the right way... that's how much I talk about this pet peeve of mine. Oh well.

I guess, it is not that big of deal where you hold your bouquet. I'm just ridiculous. But, I will definitely make sure my bouquet is held low so you can see how happy I am to be walking up to my best friend and soon to-be husband.

Sunday, April 22, 2012

Invitation: Making the RSVP card

I know it doesn’t seem like a big thing, but it was a mini project of its own to figure out what we wanted on the RSVP card. I have been told by SO MANY brides that people get really confused about how to fill out a RSVP card, so I tried to make it as easy as possible and to save myself some work as well.

Here’s a reminder of what they look like!


First, I put a RSVP date of June 1, 2012… three weeks before our wedding. It is supposed to be 2 weeks before the wedding traditionally, but it would be really nice to have counts before that. Our counts are due to all our vendors at 2 weeks, so it gives us some time to make calls in case someone forgets to send their RSVP card back.

Two: I heard from some other brides that, sometimes, people like to add in extra people to the guest list and it makes for tense conversations. I thought it would be safer to put exactly how many seats we had reserved for each party so there wouldn’t be any confusion.

Third: I got the idea to put “Names:” instead of the traditional “M___” because apparently the latter can be a bit confusing. Other brides found that their guests did not know that you are supposed to fill the “M___” in so it reads “Mr” or “Mrs” etc. Our wedding isn’t very formal anyway, so “Names:” works just fine, in my opinion.

Four: I made multiple lines for the names because I wanted people to feel free to list everyone coming to ensure we had the  correct spelling. Seeing that a few invitations were sent to a family where 10 people were included, I think all that line space was necessary!

Five: It is becoming very popular to NOT have the standard “Accept” and “Decline”. I wanted something a little fun and I know that many people who can’t make it will still be celebrating in spirit so “Will celebrate from afar” seemed just right! Here’s some examples of how crazy (in a good way!) others have gotten with their RSVPs:


From weddingbee


Six: I think my food icons are super cute! But, I guess they confused a few people. Um, I hope most people understand that you will not receive a whole cow or chicken… Mr. Barry, I am talking to you… J I wanted people to initial next to what they wanted. This is because we are having a seated dinner and I wanted to make sure you get the meal you wanted, even if multiple people from your party are coming.

Seven: You may not have noticed, but I wrote a little number on your RSVP card. I did this in case you did not put your name on the RSVP, then I would know who it came from. That number also has helped with regards to being able to organize who is coming in my excel file. I recommend doing this to any couple sending out a lot of invitations!

Lastly, I put something special on the back. I know not everyone was going to see it, but a few have…


I really want people to write us a little something. We want people to be involved and get excited because it is going to be an amazing day! And, in the process, Wes and I get reminders of what it takes to be a great couple. Also, I will use your notes as decoration on the wedding day. So, please fill out the back, as well, if you haven’t sent your RSVP back yet!!!

Invitation: The final product

There were a few ups and downs with designing our invitations, but I am so happy with how our invitation suite came out. It was a massive project. To anyone who wants to do this, it has to be a labor of love or you will hate every minute of it. I really love knowing that I cut out each piece and hand tied all that twine. I am well aware that most people spent two seconds tops untying that twine, but I think it gave it the personal touch I was looking for. We picked out the wording forever ago, but reading over it now, I get happy all over again. I hope people truly know that we want you at our wedding because, in some way or another, you are important to us and our parents. And, this isn't just some "I dos" and a cake - it is a CELEBRATION! A celebration of life. A celebration of family, friendship and the stuff that makes life worth it. Okay, I will stop being sappy. I took some "glamour shots" of my invites, so I could show them off to the world. :)


Saturday, April 21, 2012

Invitation: A few bumps in the road.

So, remember when our wedding theme was supposed to be ghost orchids? Well, one of the reasons why that theme was booted was because the only way to incorporate them was in the paper materials. They are an endangered species… I guess Wes might be mad if we went into the Fakahatchee and plucked them off the trees… Anyway, I couldn’t make the ghost orchid work with my lacking graphic art skills. I wanted the orchids on the invitation, so I drew a picture of one to scan into my computer. I tried everything to make it look good and finally resorted to making it a solid color.


Here’s the best version of the invitation I made:
I think it looks amateur. Not at all what I imagined in my head.

I tried a few other things:


I liked these okay. I would have used shimmer gray paper with the top one. But, I was missing the color purple. The second one has purple, but like I said, it was just okay. Obviously, I was digging the mixed font, especially with the font “Albemarle Swash”. I didn’t like how the loops overlapped each other, but I fixed that by downloading the fonts “Albemarle” and “Albemarle Swash End”. Using those fonts, I could pick and choose which letters I wanted to have the swashes. Then, I found this inspirational photo:


And, that’s how I came up with the idea for the final product! I hope all my family and friends are enjoying their mail!

Also, I want to say that Wes was VERY involved in designing the invitations. Not only that, but he was right there printing them out with me and putting on stamps! I wouldn't have been able to do it all without him. Thanks hunny!

Saturday, April 7, 2012

Lessons learned about photography contracts

I thought I would share some of the things I wish I would had known before booking a photographer.

Mostly what I want to share is about paying for digital copies of your photos... Overall, make sure you know exactly what you are getting.

First, make sure you are getting high-res photos. Low-res photos won't do you any good if you plan on printing anything larger than 4x6.

Make sure to ask the photographer whether they put their “signature” or not on the photos – usually it is their name in the corner of the photo. Luckily, my photographer gave us high-res files without her signature.

Make sure you understand whether you are getting, raw, edited or fully edited photos. Our photographer had a sheet explaining what we were getting so I thought I understood. I did not. I was aware that I was getting edited photos but not fully edited photos. I figured this was okay because I know how to fix stray hairs, face blemishes, etc using photoshop. When our engagement photos were ready to see, I loved the one she showed us on her website. But, when I got the digital files in the mail, they seemed not as sharp and the colors had a different tone. I was upset about this and talked with our photographer, Kristen, about the differences. I want to first say that Kristen is amazing and was very patient with me. I hired Kristen partially because I liked the style she edits with and I didn’t get that in the digital photos. She explain that she applied her vintage tint to the digital photos. However, when she finishes editing them, she lightens areas and darkens others - and this was not done on the digital photos. It is a lot of work to do that so I wasn’t happy about having to do that myself. She offered to do a few of the photos for me which was incredibly nice of her. I guess my suggestion to you is to have the photographer show you the difference between a raw photo, a minimally edited photo and then a fully edited one so you can see the difference. Ask whether the photos on your website will the same you will get for your digital files. I still think Kristen did an amazing job with our photos – I mean she made us look GOOD. I ended up editing the photos myself with Windows Photo Gallery and Photoshop. They don’t look exactly like Kristen’s but I love them. Most of the photos I just sharpened them a bit and turned up the contrast. Here’s an example of Kristen’s versus mine.


From KristenTaylorBlog.com

Mine.

From KristenTaylorBlog.com

Mine.

I used these photos to make a photobook for my mother in law that she asked me to do. I did the book on Mixbook.com and used her Groupon deal. I have to say I love Mixbook.com – it offered really cute options and I am so pleased with how it came out. So, if you are on a tight budget, then go with making your own photobook. I suggested to my mom that we make her a book through Mixbook.com instead of her ordering one through the photographer because it will save her, oh, a couple hundred buckaroos. Here’s a peak of our mixbook!


I hope that helps anyone who is hiring a photographer!